Embarking on your journey to create a website can feel daunting, especially if you’re new to the world of web hosting. Fortunately, with Hostinger web hosting, the process is straightforward and designed to help beginners succeed. This step-by-step guide will walk you through purchasing a hosting web hosting plan, setting up your domain, and launching your website, ensuring that you have all the tools you need to establish a strong online presence.
Table of Contents
Step 1: Choose Your Hostinger Web Hosting Plan
Visit Hostinger’s Web hosting and begin by navigating to Hostinger’s homepage. You’ll find a clean, user-friendly interface that makes it easy to explore your options.
Here’s a quick overview of the hostinger web hosting plans available:
- Single Shared Hostinger Web Hosting: This plan is perfect for beginners and personal websites. It includes hosting for one website, 50 GB of SSD storage, 1 email account, Unlimited free SSL, Weekly backups and is optimized for WordPress.
- Premium Shared Hostinger Web Hosting: Ideal for small businesses and growing websites, this plan allows you to host 100 websites, 100 GB of SSD storage, Free domain (₱509.00 value), Free email, unlimited SSL, Starter WooCommerce and managed WordPress Hosting.
- Business Shared Hostinger Web Hosting: Ideal for business owner that allow you to host 100 website, 200 GB NVMe storage, Hostinger Website Builder, Free domain (₱509.00 value), Free automatic website migration, Free email, Unlimited free SSL, Daily backups (₱1,428.00 value) and best plan for e-commerce websites.
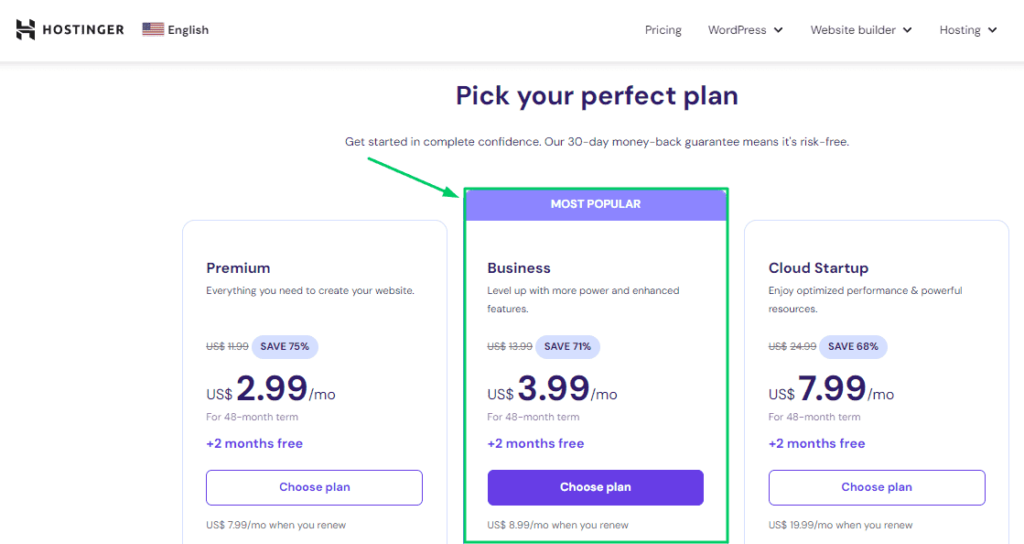
Click on the Plan You Want: After reviewing the features of each plan, click on the “choose plan” button for the one that best meets your need and pick your perfect hostinger web hosting plan.
Step 2: Create Your Hostinger Account
- Fill Out the Registration Form: To create a Hostinger account, fill in your email address and create a secure password. Alternatively, you can sign up using your Google or Facebook account for a quicker registration process.
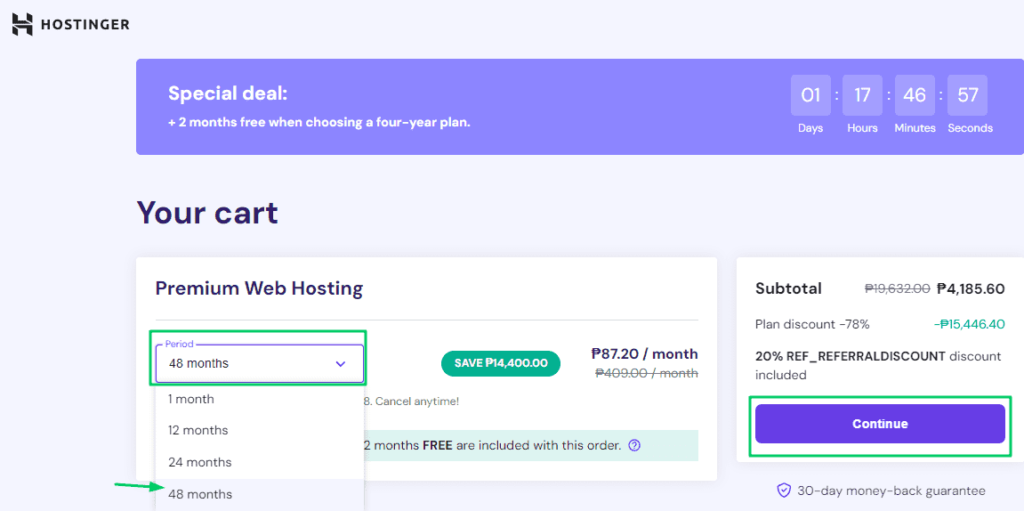
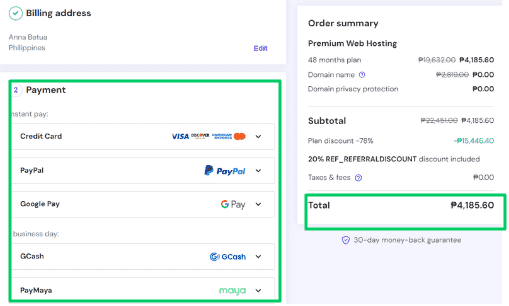
2.Add Payment Information: After registering, you will need to enter your payment details. Hostinger accepts various payment methods, including credit/debit cards, PayPal, and cryptocurrencies. Review your order to ensure everything is correct and apply any promotional codes you may have.
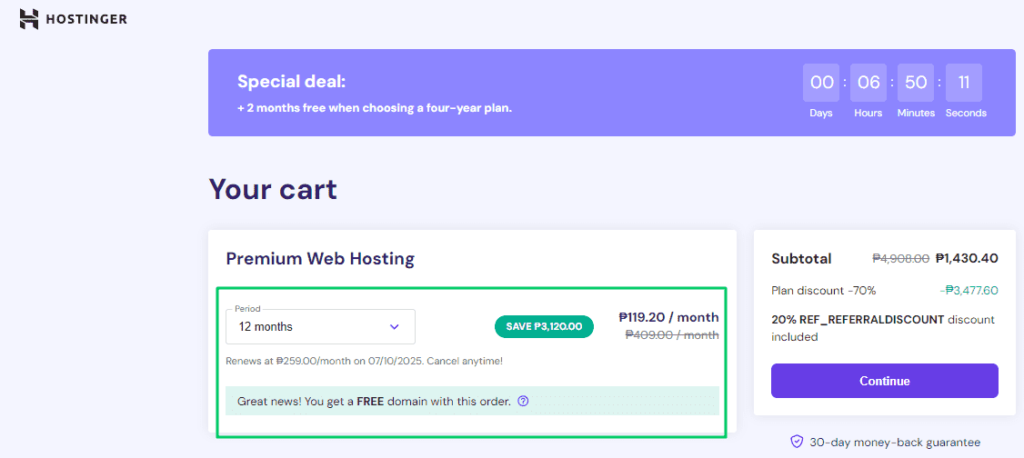
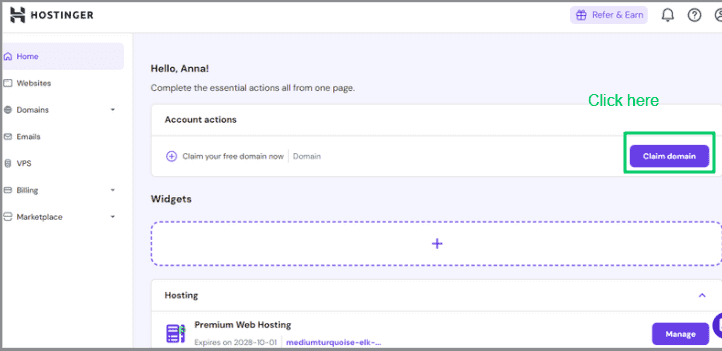
Choose the 12 months plan and then you can get your domain name for FREE in 1 year and get up to 70% discount from it’s regular price check that here! And then check how to get your free hostinger domain here.
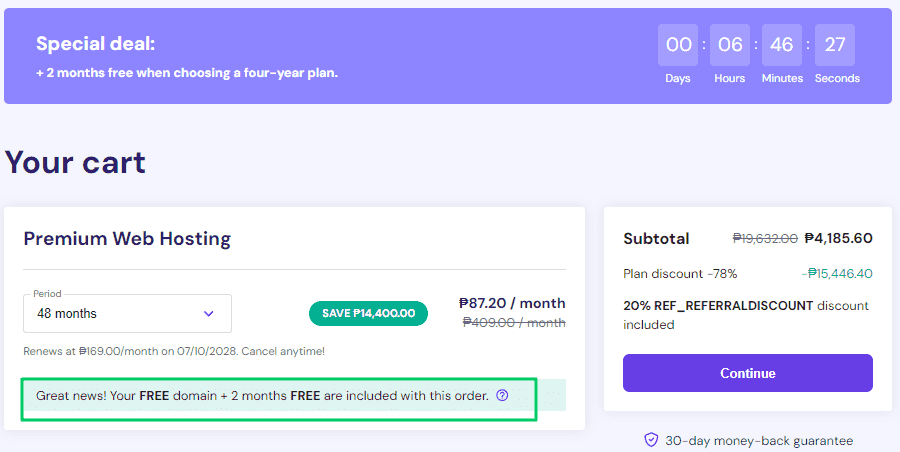
Choose the 48 months plan and then you can get your domain name for FREE in 1 year, plus 2 extra months FREE , get up to 78% discount from it’s regular price check that here! . And then check how to get your free hostinger domain here
3. Complete the Purchase: Click the “Checkout” button to finalize your order. You will receive a confirmation email containing your account details and order summary.
Step 3: Choose Your Domain Name
Register a New Domain After selecting your hosting plan, you will be prompted to choose a domain name. Your domain name is your website’s address on the internet, so it’s important to choose one that reflects your brand or business. Enter your desired domain name in the search box and click “Search.”
Check Availability: If your preferred domain name is available, you can proceed to register it. If it’s not available, consider trying different variations, using relevant keywords, or exploring alternative domain extensions (like .net, .org, or .com).
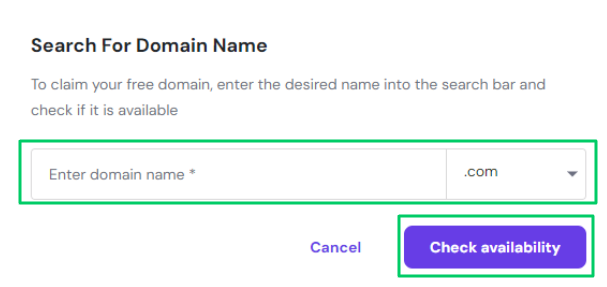
Add Domain Registration: Once you find an available domain name, add it to your cart. If you already own a domain, select the option to use an existing domain and enter it accordingly.
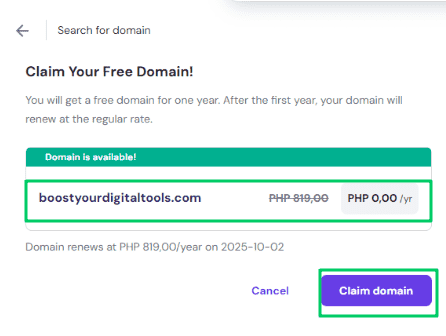
Step 4: Create Your Hostinger Account
- Fill Out the Registration Form To create a Hostinger account, fill in your email address and create a secure password. Alternatively, you can sign up using your Google or Facebook account for a quicker registration process.
- Add Payment Information After registering, you will need to enter your payment details. Hostinger accepts various payment methods, including credit/debit cards, PayPal, and cryptocurrencies. Review your order to ensure everything is correct and apply any promotional codes you may have.
- Complete the Purchase Click the “Checkout” button to finalize your order. You will receive a confirmation email containing your account details and order summary.
Step 5: Access Your Hostinger Control Panel (hPanel)
- Log In to hPanel After your purchase is complete, return to Hostinger’s website and log in to your account. You’ll be directed to the hPanel, which serves as your control center for managing your web hosting.
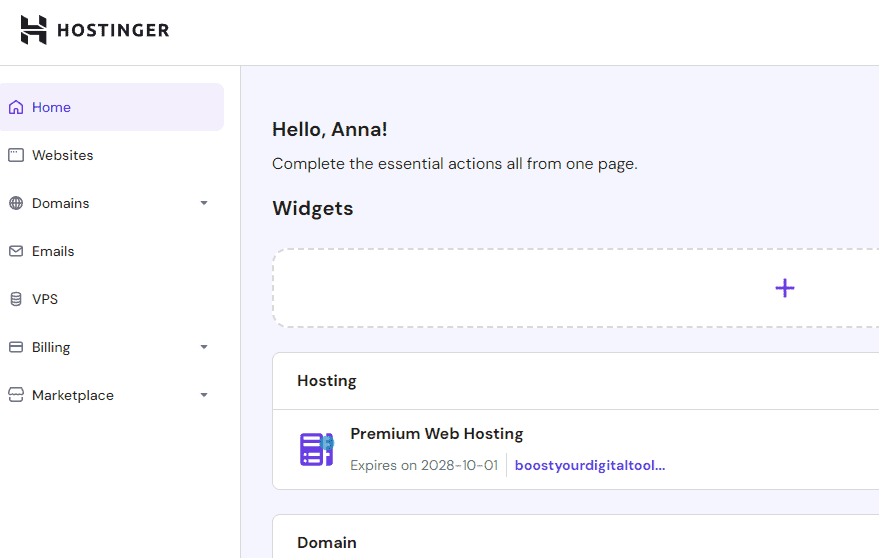
2. Familiarize Yourself with hPanel Spend a few minutes exploring the hPanel. Here, you can manage your domain, set up emails, access file management, and utilize tools for building your website. Familiarizing yourself with the layout will help streamline the setup process.
Step 6: Install WordPress (or Your Preferred CMS)
- Navigate to the Auto-Installer In the hPanel, locate the “Website” section and click on “Auto Installer.” This tool allows you to set up your website quickly and easily.
- Select WordPress From the list of available applications, choose WordPress, which is a popular content management system (CMS) that powers a significant portion of the web. It’s user-friendly and perfect for beginners.
- Fill in Site Details The installer will prompt you to enter details for your site:
- Website Title: This is the name of your site, which will be displayed on search engines and the browser tab.
- Admin Username: Choose a unique username for the WordPress admin area.
- Admin Password: Create a strong password to secure your site.
- Admin Email: Enter a valid email address where you can receive notifications and reset your password if necessary.
- Click on Install After entering the required information, click on the “Install” button. The installation process will only take a few moments. Upon completion, you will see your WordPress login link, allowing you to access your new site.
Step 7: Configure Your WordPress Site
- Log In to WordPress Use the admin credentials you created during the installation process to log in to your WordPress dashboard. This is where you’ll manage all aspects of your website.
- Choose a Theme Navigate to “Appearance” > “Themes” on the left sidebar. Here, you can choose from the pre-installed themes or upload a new one. Themes dictate the design and layout of your website, so choose one that aligns with your brand or personal style.
- Install Essential Plugins Plugins enhance the functionality of your WordPress site. Go to “Plugins” > “Add New” to search for and install essential plugins for SEO, security, and performance. Here are some must-have plugins for beginners:
- Yoast SEO: Helps optimize your site for search engines.
- Wordfence Security: Protects your site from security threats.
- WP Super Cache: Improves your site’s loading speed by caching pages.
Step 8: Launch Your Website
- Add Content Start creating content for your site by adding pages (e.g., Home, About, Contact) and posts (e.g., blog articles, news updates). High-quality, engaging content is key to attracting visitors and keeping them on your site.
- Preview Your Website Before launching, it’s crucial to preview your website to ensure everything looks good and functions properly. Check the layout, images, and links, and make any necessary adjustments.
- Make Your Site Live Once you’re satisfied with your site, go to the “Settings” > “General” tab in WordPress to set your site title and tagline. Additionally, ensure that your site is set to “Public” in the privacy settings to allow search engines to index it.
- Promote Your Website Share your new website with friends, family, and on social media to attract visitors. Consider implementing basic SEO practices to improve your site’s visibility on search engines, such as optimizing content with relevant keywords, using alt tags for images, and building backlinks.
Conclusion
Congratulations on successfully setting up your first website using Hostinger web hosting! You’ve navigated through the essential steps of choosing a hosting plan, registering a domain name, and installing WordPress, and now you have a functional online presence. This accomplishment is significant, especially if you’re new to web hosting and website creation.
As you embark on this exciting journey, it’s important to recognize that building a website is just the beginning. Here are several key aspects to consider moving forward:
- Continuous Learning and Improvement: The digital landscape is always evolving, and staying informed about the latest trends, tools, and best practices will help you enhance your website. Invest time in learning about search engine optimization (SEO), user experience (UX), and content marketing strategies to attract and retain visitors. Hostinger’s blog and tutorials are valuable resources that can provide insights and tips tailored for beginners.
- Content Is King: The success of your website largely depends on the quality of your content. Focus on creating engaging, relevant, and high-quality content that resonates with your target audience. Regularly update your blog with fresh articles, tutorials, or insights related to your niche. Consistent content creation not only keeps your audience engaged but also improves your website’s ranking on search engines, helping you reach a broader audience.
- Engage with Your Audience: Building a successful website goes beyond just publishing content; it involves engaging with your audience as well. Encourage visitors to leave comments on your blog posts, respond to their inquiries, and foster a sense of community. Consider incorporating features like social media sharing buttons, newsletters, and contact forms to facilitate interaction. Engaging with your audience can help build trust and loyalty, making them more likely to return to your site.
- Optimize for Performance: A fast-loading website is essential for a positive user experience. Regularly monitor your website’s performance and make necessary optimizations. Utilize caching plugins, optimize images, and consider a Content Delivery Network (CDN) to improve loading times. Hostinger’s Business Shared Hosting plan includes features like daily backups and website optimization tools that can help enhance your site’s performance.
- Leverage Analytics: Understanding how visitors interact with your website is crucial for making informed decisions. Use tools like Google Analytics to track visitor behavior, traffic sources, and conversion rates. This data will help you identify areas for improvement and tailor your content to better meet the needs of your audience.
- Explore Advanced Features: Once you become comfortable with the basics, consider exploring more advanced features offered by Hostinger. These may include setting up an online store with WooCommerce, adding membership areas, or integrating custom email solutions. The flexibility and scalability of Hostinger web hosting plans allow you to grow your website alongside your ambitions.
- Stay Secure: Website security should be a top priority as you continue to build and grow your site. Regularly update your WordPress version, themes, and plugins to protect against vulnerabilities. Implementing security plugins, using strong passwords, and enabling two-factor authentication can also enhance your site’s security.
- Seek Help When Needed: Don’t hesitate to reach out for help if you encounter challenges or have questions. Hostinger offers 24/7 customer support that can assist you with technical issues or concerns. Additionally, you can find numerous online forums and communities dedicated to Hostinger web hosting and WordPress, where you can connect with other users and gain valuable insights.
Ultimately, the journey of building and managing a website in hostinger web hosting is an ongoing process. As you gain more experience and confidence, you’ll discover new ways to enhance your site and connect with your audience. Remember that every website evolves over time, and your initial setup is just the first step in a much larger adventure.
By leveraging the tools and support provided by Hostinger web hosting, you are well on your way to creating a successful online presence. Embrace the opportunities that come your way, stay curious, and enjoy the process of bringing your ideas to life with hostinger web hosting and your first website is now live—welcome to the exciting world of online possibilities!
Now is the perfect time to dive into the world of web development—take your newfound skills and creativity and make your mark on the internet!

